If you are here without reading the previous article Dockerfile: Layered Architecture, then I would encourage you to read it first as some of the things in this article would not make sense without that.
In the previous article, we built our own Docker image using the simplest of Dockerfiles. We managed to get our application working, but not without some manual interventions to take care of a few things that we did not care about at the time. The most important one being, we had to go inside the container and change the database host name in the database connection string. Ideally, we would also have to change the username and password as well as they are hard-coded in our properties file.
The reason we ran into these issues in the first place was because we copied the pre-packaged war file directly to Tomcat’s webapps folder. Because of this, we were unable to update the properties file before starting a running container from the image.
So one crude solution is we can include the values we want in the properties file BEFORE we package the war file and then build our application code. And the easiest way to do that is with a multi-stage build. Note that this is not an ideal solution. I am just doing this to demonstrate multi-stage build.
Using Multi-stage Builds
In multi-stage builds, we use multiple
Docker DocsFROMstatements in our Dockerfile. EachFROMinstruction can use a different base, and each of them begins a new stage of the build. You can selectively copy artifacts from one stage to another, leaving behind everything you don’t want in the final image.
So in our case, in the first stage, we will use Maven to build our project and package the war file. In the second stage, we can copy the war file created in the first stage to webapps directory in Apache Tomcat.
Dockerfile for Our Multi-stage Build
The Dockerfile for this will look like this.
FROM maven:3.6.3-openjdk-16-slim AS build

COPY ./mobile-app-ws /usr/local/mobile-app-ws

WORKDIR /usr/local/mobile-app-ws/

RUN mvn -Dmaven.test.skip=true clean package


FROM tomcat:8

COPY --from=build /usr/local/mobile-app-ws/target/mobile-app-ws-0.0.1-SNAPSHOT.war /usr/local/tomcat/webapps/mobile-app-ws.war

EXPOSE 8080

CMD ["catalina.sh", "run"]
First Stage
- Here the first stage of the build starts with the first
FROM. I am using a Maven 3.6.3 image based on OpenJDK 16 since those were the versions I used when developing this application. In Docker Hub, when you look up an image, there is a tab called tags which shows you all the available different versions of the image and from there, you can find which one suits your needs the best.AS buildallows me to specify a name for this stage so that I can use that name in later stages when I need to refer to a resulting artefact from this stage. - In the next
COPYstep I am copying my whole project directory to the container. This time I need the whole project, not just the war file since I am going to build and package the war file. - The third step
WORKDIRchanges the current working directory to the one specified as the argument. This means, any commands run after this will run in this specified directory. The reason to change the working directory to this is because that’s where thepom.xmlfile for the project is. - The last step of first stage is building the project using
mvn packagecommand. You need to specify the build option-Dmaven.test.skip=trueto skip Spring unit testing during the build. The build will fail if this was not specified with an error that would suggest that the database could not be found. Thecleanoption would delete everything in the target directory and recreate everything from scratch.
So by the end of the first stage, we should have the war file that we need to deploy into Tomcat.
Second Stage
- As we have packaged our war file in the first stage, the second stage starts with the second
FROMfor Tomcat. - In the next step, we copy the war file created in first stage to the webapps directory in Tomcat. Notice that the war file is renamed as well, appropriately.
--from=buildoption specifies that the file should be taken from the first stage. ‘build’ is the name we provided for first stage. EXPOSEcommand will expose Tomcat default port as the container port.- The last line is the command to run when starting a container from the image. Here we are running the
catalina.shfile in Tomcat Server.
In our previous article Dockerfile: Layered Architecture, we discussed about keeping the layers as small as possible. So here something to note is that, even though we copied our whole project directory in the first stage, we only copy the built artefacts to the second stage, which in our case, the war file resulting from the Maven build. All the other intermediate artefacts are left behind and not copied to the final image.
Therefore, even though our Dockerfile seeming has more layers, the resulting image would still be about the same as before! This is the coolest thing about multi-stage build. We get the same result, if not better, with much less complexity.
Building the Image
To build the image, we use the docker build command as usual. Make sure to update the \\mobile-app-ws\src\main\resources\application.properties file with the required values for database host, username and password.
C:\WINDOWS\system32>docker build --progress=plain -t myapp:v2 "C:\Users\charith\Desktop"This could take a few minutes.
--progress=plain option will show the output in the command line as plain text, which would make it easier to read. This time I have specified a tag for my image as v2 so that I know this is a different version.
Notice that the build context in this case is “C:\Users\charith\Desktop” directory, which means the Dockerfile is in the same directory and my project is in “C:\Users\charith\Desktop\mobile-app-ws” directory. This is very important because the COPY command looks at directories relative to where the build context.
Running a Container from the New Image
Once the image is built successfully, we can run a container using it like we did earlier.
charith@ch MINGW64 ~
 $ docker run -d --name ws-myappv2 \
   -p 38081:8080 \
   --network=myapp \
   myapp:v2
   863f616c27f7348c545aceca40d1bd5887353875a135629b3668446fbf31b662
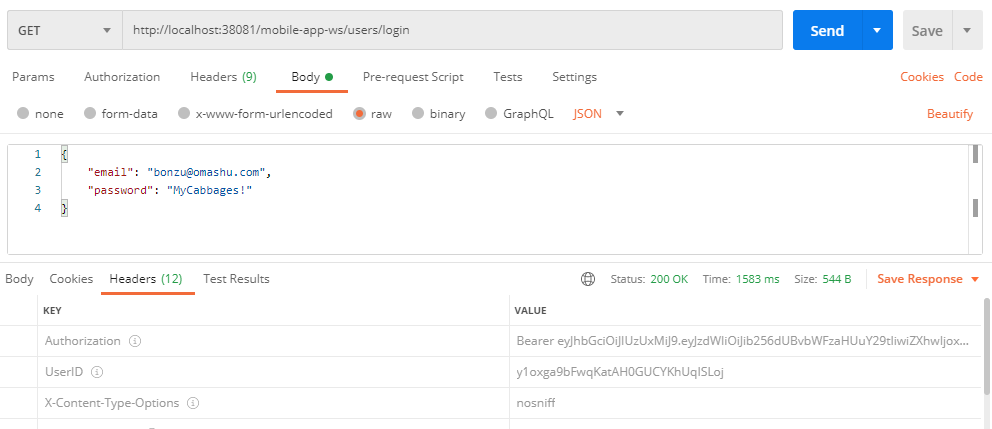
Now all I need to do is just call one of the services to see if it is working, which it does!

You need to have the MySQL database running before you do this. Since I already have data in the database from earlier, I do not need to sign up or anything.
Okay, so we didn’t have to go inside the Docker container and update the properties file using vim this time, but still it’s not perfect. Still we had to manually give the database host, username and password in the properties file before building the image, which does not give us the convenience of simply running a container without having to build the image every time we need to change datasource parameters. Why can’t we give them when we run a container from the image as parameters?
That’s what the next article Dockerfile: Environment Variables is about.


