

In previous articles we built our own image and deployed our application into Apache Tomcat server. As you might be aware, Tomcat has a manager app which allows us to mange the web applications deployed on the server. We can access it from a URL similar to this.
http://localhost:48080/manager
Here 48080 is the host port assigned when running the container. So if I enter this URL into the browser, I get a 404 - Not Found error.

This is because all default Tomcat web apps have been removed from the webapps directory for all Tomcat Docker images starting with Tomcat version 7. All these apps have been moved to /usr/local/tomcat/webapps.dist directory so that they are not deployed by default when running a container for security puposes.
So in order to make it available, we need to follow some additional steps.
If you have followed the previous Docker articles before coming to this one, then you can use one of the application containers for this and skip step 1 below.
Step 1: start a Tomcat container.
chairth@ch MINGW64 ~
 $ docker run -d --name tomcat-manager \
   -p 48080:8080 \
   tomcat
Notice that I have mapped Tomcat container’s 8080 default port to 48080 on the host machine. Now when I enter http://localhost:48080/manager/ into a browser, I get a 404 page as above.
If I go into the container and check the webapps directory, I can see that the manager app is not there.
C:\WINDOWS\system32>docker exec -it tomcat-manager sh
# cd webapps
# ls
Since there is nothing in webapps directory at the moment, ls command shows an empty result set.
Step 2: copy the manager app to webapps folder.
As I mentioned above, we can find the manager app inside the webapps.dist folder. So all we need to do is just copy the manager folder from that directory into the webapps folder like this.
C:\WINDOWS\system32>docker exec -it tomcat-manager sh
# cp -r webapps.dist/manager webapps/manager
#
Now if I go back to the browser and enter http://localhost:48080/manager/, I get a 403 - Access Denied error like below.
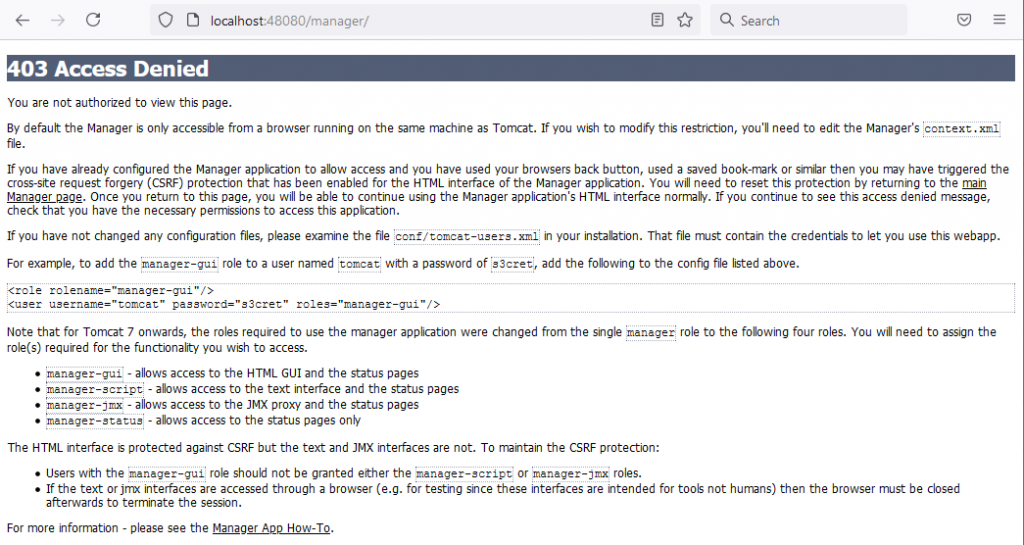
If you read this message, it pretty much explains what the problem is and everything we need to remedy it.
By default, the manager is only accessible from a browser running on the same machine as Tomcat. If you wish to modify this restriction, you’ll need to edit the Manager’s context.xml file. So this error makes sense because we have deployed Tomcat in Docker container and we are trying to access it from the Docker host machine.
Step 3: edit the context.xml file.
We can use vim to edit the context.xml file. It is located in /usr/local/tomcat/webapps/manager/META-INF directory
C:\WINDOWS\system32>docker exec -it tomcat-manager sh
# cd webapps/manager/META-INF
# vim context.xml
contents of the file looks like below.
<?xml version="1.0" encoding="UTF-8"?>
<Context antiResourceLocking="false" privileged="true" >
  <CookieProcessor className="org.apache.tomcat.util.http.Rfc6265CookieProcessor"
                   sameSiteCookies="strict" />
  <Valve className="org.apache.catalina.valves.RemoteAddrValve"
         allow="127\.\d+\.\d+\.\d+|::1|0:0:0:0:0:0:0:1" />
  <Manager sessionAttributeValueClassNameFilter="java\.lang\.(?:Boolean|Integer|Long|Number|String)|org\.apache\.catalina\.filters\.CsrfPreventionFilter\$LruCache(?:\$1)?|java\.util\.(?:Linked)?HashMap"/>
</Context>
What we need to do here is locate the Valve tag and comment it out like below.
  <!--Valve className="org.apache.catalina.valves.RemoteAddrValve"
         allow="127\.\d+\.\d+\.\d+|::1|0:0:0:0:0:0:0:1" /-->
This will allow us to access the Tomcat manager from our host machine. Before we can login though, we still need to add a role and a user as mentioned in above 403 error message.
Step 4: add a role and a user
To add a new role and a user, we need to edit the tomcat-users.xml file located in /usr/local/tomcat/conf folder in our container. You can run following commands to open the file using vim.
C:\WINDOWS\system32>docker exec -it tomcat-manager sh
# cd conf
# vim tomcat-users.xml
#
The file looks similar to this and I have added a role named manager-gui and a user named tomcat. Do note that manager-gui is a predefined role that needs to be assigned to any user that needs to access Tomcat manager.
 <?xml version="1.0" encoding="UTF-8"?>
 <tomcat-users xmlns="http://tomcat.apache.org/xml"
               xmlns:xsi="http://www.w3.org/2001/XMLSchema-instance"
               xsi:schemaLocation="http://tomcat.apache.org/xml tomcat-users.xsd"
         version="1.0">
         <role rolename="manager-gui"/>
         <user username="tomcat" password="secret" roles="manager-gui"/>
 </tomcat-users>
Once the file is updated, we can restart our docker container and check whether we can access Tomcat manager now.
Once we enter the URL, we are prompted for user credentials and we can give the credentials of the user we gave above. And it works!


Great tutorial, thanks !
Many thanks.
Help me a lot.
Thanks, this helped in my case.