
One of the reasons Docker containers and services are so powerful is that you can connect them together, or connect them to non-Docker services too if necessary. Docker containers and services do not even need to be aware that they are deployed on Docker, or whether their counterparts are also hosted on Docker or not.
Docker has thee types of Network drivers.
- Bridge: The default network driver. If you don’t specify a driver, this is the type of network you are creating. Bridge networks are usually used when your applications run in standalone containers that need to communicate. Allows to have the same port for multiple containers and you can map them to docker host’s ports.
- Host: For standalone containers, remove network isolation between the container and the Docker host, and use the host’s networking directly. Therefore cannot have containers with same ports.
- None: Disables all networking. Usually used in conjunction with a custom network driver. Since this does not have a network, not accessible from outside.
Let’s look at some commands related to Docker networks.
List Down Available Networks
Docker network ls can be used for this.
C:\WINDOWS\system32>docker network ls
 NETWORK ID     NAME            DRIVER    SCOPE
 2b2b04f92c7d   bridge          bridge    local
 454baa65de5c   host            host      local
 4b7f6d5826e4   none            null      local
Identify the Network A Container Belongs to
We can use the docker inspect command as below to get the network.
C:\WINDOWS\system32>docker inspect --format="{{.NetworkSettings.Networks}}" bbox
 map[bridge:0xc000506000]
Docker network inspect
We can find out details of a particular network such as the subnet mask, containers attached to the network and their IP addresses using docker network inspect command. In this case I am fetching details of bridge network. I haven’t put the full output here, just a portion of it.
C:\WINDOWS\system32>docker network inspect bridge
 [
     {
         "Name": "bridge",
         "Id": "2b2b04f92c7dd18add623a1f1972e689ffc794509d1b1469a3123343739f254c",
         "Created": "2021-05-16T10:12:07.5307878Z",
         "Scope": "local",
         "Driver": "bridge",
         "EnableIPv6": false,
         "IPAM": {
             "Driver": "default",
             "Options": null,
             "Config": [
                 {
                     "Subnet": "172.17.0.0/16",
                     "Gateway": "172.17.0.1"
                 }
             ]
         },
Create a Docker Network
To create a docker network, we can use the docker network create command.
C:\WINDOWS\system32>docker network create my-new-network --driver=bridge
 05cc46db5b85497a05a4e298ee80ca777fe0dfe1d77938935765726ae4e4b784
You can specify which driver you want the network to be created with. Once you have created a network, you can associate your containers with this newly created network.
C:\WINDOWS\system32>docker run -d --name myRedis --net=my-new-network redis
 43c88ef7c0cdfdfb06ed549bceea5b243b63f190a900bb8c4b54972852920e5e
Once the container is created, let’s run docker inspect command on our new container.
C:\WINDOWS\system32>docker inspect --format="{{json .NetworkSettings.Networks}}" myRedis
...
...
"Networks": {
                 "my-new-network": {
                     "IPAMConfig": null,
                     "Links": null,
                     "Aliases": [
                         "43c88ef7c0cd"
                     ]
...
...
Here I have put only the Networks portion of the output and you can see that it is attached to the new network we created.
Port Mappings
Port Mappings is an important part in Docker Networks. For instance, if you want to access one of your containers from outside, you have to make it accessible by mapping container port to a port in Docker host.
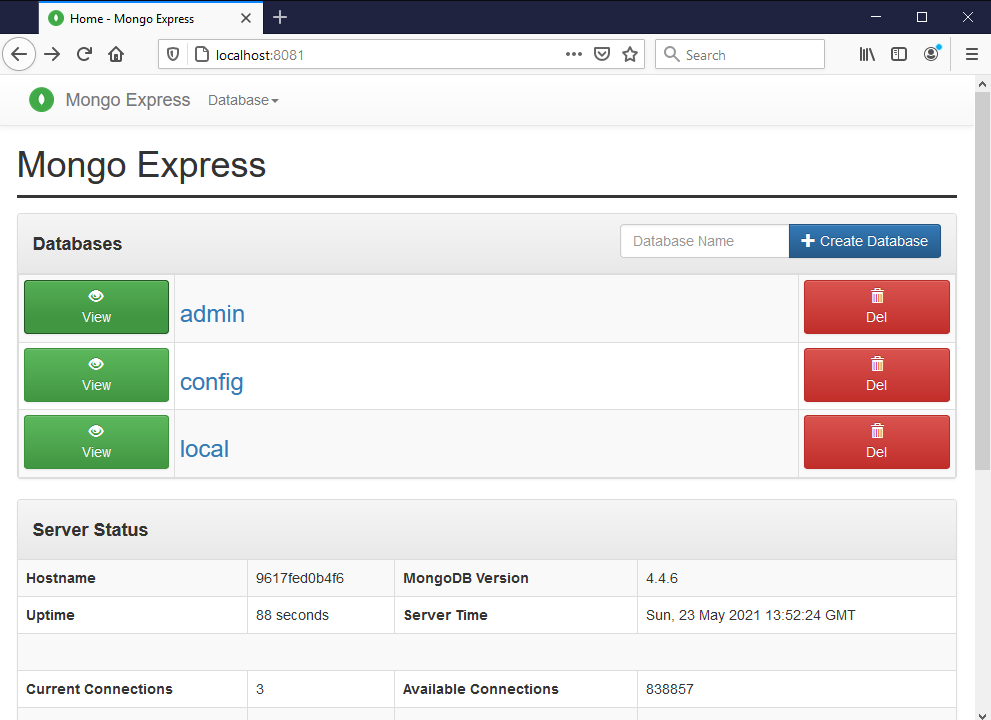
To demonstrate this, I am going to use MongoDB and Mongo Express. In case you are unfamiliar with these two, Mongo Express is a web-based MongoDB admin interface. First we have to create a MongoDB container.
charith@ch MINGW64 ~
$ docker run -d --net my-new-network --name mongodb \
     -e MONGO_INITDB_ROOT_USERNAME=mongoadmin \
     -e MONGO_INITDB_ROOT_PASSWORD=secret \
     mongo
Note that here I have used backslashes at the end of each line except the last so that I can type my command in multiple lines to improve readability. Unfortunately, Windows command line does not respond well to this backslash, so I had to use MinTTY based GitBash terminal. There are some quirks with GitBash as well, which is why I was using Windows command line in the first place. If you keep using it, you would find out.
charith@ch MINGW64 ~
 $ docker run -d --name mongoex --net my-new-network \
   -e ME_CONFIG_MONGODB_SERVER=mongodb \
   -e ME_CONFIG_MONGODB_ADMINUSERNAME=mongoadmin \
   -e ME_CONFIG_MONGODB_ADMINPASSWORD=secret \
   -p 8081:8081 \
   mongo-express
   51287a156827ccd8c346fbe799a674cf62c8a470c05914a7a9456acd23bd9750
Notice that we have to specify the MongoDB container name as a mandatory environment variable. You can find it in Docker Hub documentation for Mongo Express image. Furthermore, both containers should be in the same network for them to be able to talk to each other.
Also note the -p 8081:8081 part. here the port left of the colon refers to the port on docker host or the external port while the port right of the colon refers to the port of the container. If you do a docker inpsect for the mongoex container and look at NetworkSettings, you can see the port mapping there as well.
"NetworkSettings": {
             "Bridge": "",
             "SandboxID": "b12715a61cb9083cd24c92a33b70271458426f0bf586af957d169f545f93bbe9",
             "HairpinMode": false,
             "LinkLocalIPv6Address": "",
             "LinkLocalIPv6PrefixLen": 0,
             "Ports": {
                 "8081/tcp": [
                     {
                         "HostIp": "0.0.0.0",
                         "HostPort": "8081"
                     },
                     {
                         "HostIp": "::",
                         "HostPort": "8081"
                     }
                 ]
             }
Once the container is up and running we can access Mongo Express though our local browser via http://localhost:8081.